저번 시간에 포스팅한 3 Layer Architecture 구조를 기반으로
할일 관리 프로젝트를 Spring Boot로 제작해보았습니다.
https://kimslab01.tistory.com/28
[Spring] 3 Layer Architecture | Spring 3 Layer
✔ 3 Layer Architecture란? 서버를 개발 관점에서 각 계층별로 역할을 분리하는 개념입니다. 1. Presentation Layer, Controller역할: 사용자가 입력한 데이터의 형식이나 간단한 유효성 검사를
kimslab01.tistory.com
궁금하신 분들은 포스팅 참고해주시면 감사하겠습니다.
할일을 관리하는 프로젝트를 구현하기 위해서는
- 일정을 저장, 단건 조회, 수정할 수 있습니다.
- 일정은 작성 유저명, 할일 제목, 할일 내용, 작성일, 수정일 필드를 갖고 있습니다.
이 조건을 지녀야 합니다.
그리고 3 Layer Architecture와 DTO를 이용하여 구조를 설계했는데요!
프로젝트의 파일이 많아지기 때문에 복잡하게 느껴지실 수 있습니다만,
개념을 잘 파악하고 계신다면 어렵지 않을 것입니다.
구조를 먼저 보여드리겠습니다.
src
└── main
    ├── java
    │   └── com
    │       └── sparta
    │           ├── controller
    │           │   └── ScheduleController.java
    │           ├── dto
    │           │   ├── ScheduleRequestDTO.java
    │           │   └── ScheduleResponseDTO.java
    │           ├── entity
    │           │   ├── Schedule.java
    |		|	└── Timestamped.java
    │           ├── repository
    │           │   └── ScheduleRepository.java
    │           ├── service
    │           │   └── ScheduleService.java
    │           └── ScheduleApplication.java
    └── resources
        └── application.properties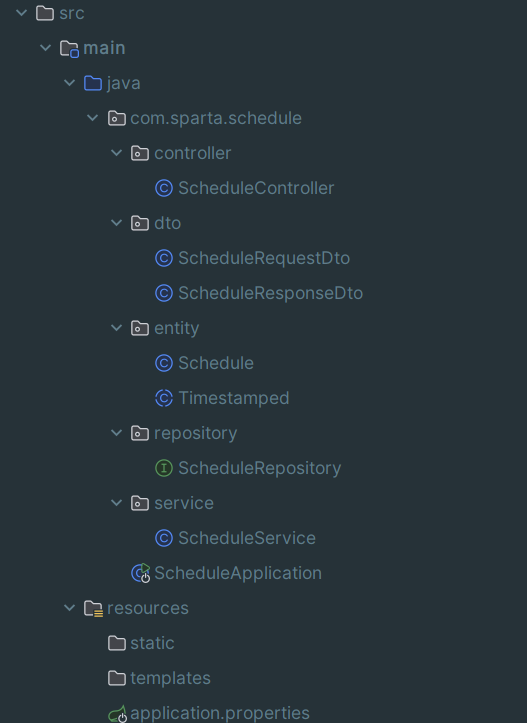
보기 좋게 구조를 정리해봤습니다!
첫번째로 3 Layer 구조를 맞춰주기 위해 controller, repository, service, entity 패키지를 만든 다음에 그 안에 클래스를 만들었습니다.
DTO도 requestDto, responseDto로 나누어 클래스로 생성해주었습니다.
저는 여기서는 html/css 파일을 넣지 않아 static 부분에는 코드가 없습니다.
그래서 브라우저로 직접 api가 생성되었는지 아닌지 확인하기 어려워 postman을 사용하였습니다.
하나씩 코드를 알려드리도록 하겠습니다.
1. ScheduleController
package com.sparta.schedule.controller;

import com.sparta.schedule.dto.ScheduleRequestDto;
import com.sparta.schedule.dto.ScheduleResponseDto;
import com.sparta.schedule.service.ScheduleService;
import org.springframework.web.bind.annotation.*;

@RestController
@RequestMapping("/api/schedule")
public class ScheduleController {

    private final ScheduleService scheduleService;
    public ScheduleController(ScheduleService scheduleService) {
        this.scheduleService = scheduleService;
    }

    @PostMapping
    public ScheduleResponseDto createSchedule(@RequestBody ScheduleRequestDto requestDto) {
        return scheduleService.saveSchedule(requestDto);
    }

    @GetMapping("/{id}")
    public ScheduleResponseDto getSchedule(@PathVariable long id) {
        return scheduleService.getSchedule(id);
    }

    @PutMapping("/{id}")
    public ScheduleResponseDto updateSchedule(@PathVariable Long id, @RequestBody ScheduleRequestDto requestDto) {
        return scheduleService.updateSchedule(id, requestDto);
    }
}
@RestController 어노테이션을 사용해주었습니다.
생성자 주입을 직접 해주었습니다.
createSchedule 메서드로 requestDto에 있는 sername, title, description를 입력하여 할일을 추가하게 했습니다.
getSchedule 메서드에서는 id를 통해 단건의 할일을 조회할 수 있도록 했습니다.
updateSchedule 메서드에 id값과 requestDto에 있는 sername, title, description을 입력하면 바로 조회할 수 있도록 했습니다.
2-1. ScheduleRequestDto
package com.sparta.schedule.dto;

import lombok.Getter;

@Getter
public class ScheduleRequestDto {
    private String username;
    private String title;
    private String description;
}
@Getter로 username, title, description 데이터를 요청하도록 했습니다.
2-2. ScheduleResponseDto
package com.sparta.schedule.dto;

import com.sparta.schedule.entity.Schedule;
import lombok.Getter;

import java.time.LocalDateTime;

@Getter
public class ScheduleResponseDto {
    private Long id;
    private String username;
    private String title;
    private String description;
    private LocalDateTime createdDate;
    private LocalDateTime modifiedDate;

    public ScheduleResponseDto(Schedule schedule) {
        this.id = schedule.getId();
        this.username = schedule.getUsername();
        this.title = schedule.getTitle();
        this.description = schedule.getDescription();
        this.createdDate = schedule.getCreatedDate();
        this.modifiedDate = schedule.getModifiedDate();
    }
}
조건에서 필요로 하는 id, username, title description, createdDate, modifiedDate를 반환하도록 했습니다.
3-1. Schedule
package com.sparta.schedule.entity;

import com.sparta.schedule.dto.ScheduleRequestDto;
import jakarta.persistence.*;
import lombok.Getter;
import lombok.NoArgsConstructor;
import lombok.Setter;

import java.time.LocalDateTime;

@Entity
@Getter
@Setter
@Table(name = "schedules")
@NoArgsConstructor
public class Schedule {
    @Id
    @GeneratedValue(strategy = GenerationType.IDENTITY)
    private Long id;

    private String username;
    private String title;
    private String description;
    private LocalDateTime createdDate;
    private LocalDateTime modifiedDate;

    public Schedule(ScheduleRequestDto requestDto) {
        this.username = requestDto.getUsername();
        this.title = requestDto.getTitle();
        this.description = requestDto.getDescription();
        this.createdDate = LocalDateTime.now();
        this.createdDate = LocalDateTime.now();
    }

    public void update(ScheduleRequestDto requestDto) {
        this.username = requestDto.getUsername();
        this.title = requestDto.getTitle();
        this.description = requestDto.getDescription();
        this.modifiedDate = LocalDateTime.now();
    }
}
entity에서는 요청한 데이터를 set해주도록 했고
update에서는 요청한 데이터들에 입력된 데이터를 set해주고, modifiedDate를 now로 설정하여 현재 시각으로 입력되도록 했습니다.
그리고 저는 데이터베이스 연결은 MySQL로 해주었는데요!
데이터베이스 이름을 schedules라고 해서 @Table(name = "schedules")로 설정해주었습니다.
3-2. Timestamped
package com.sparta.schedule.entity;

import jakarta.persistence.*;
import lombok.Getter;
import org.springframework.data.annotation.CreatedDate;
import org.springframework.data.annotation.LastModifiedDate;
import org.springframework.data.jpa.domain.support.AuditingEntityListener;

import java.time.LocalDateTime;

@Getter
@MappedSuperclass
@EntityListeners(AuditingEntityListener.class)
public abstract class Timestamped {

    @CreatedDate
    @Column(updatable = false)
    @Temporal(TemporalType.TIMESTAMP)
    private LocalDateTime createdDate;

    @LastModifiedDate
    @Column
    @Temporal(TemporalType.TIMESTAMP)
    private LocalDateTime modifiedDate;
}
@CreatedDate로 처음 입력된 시각을 찍어주고
@Column(updatable = false)로 updatable이 불가능하도록 해주었습니다.
@LastModifiedDate로 수정된 시각을 찍어주고
@Column의 디폴트값인 true를 그대로 두면서 업데이트될 때마다 타임스탬프를 찍도록 해주겠습니다.
4. ScheduleRepository
package com.sparta.schedule.repository;

import com.sparta.schedule.entity.Schedule;
import org.springframework.data.jpa.repository.JpaRepository;

public interface ScheduleRepository extends JpaRepository<Schedule, Long> {
}
인터페이스로 구현했고 JpaRepository를 상속했습니다.
5. ScheduleService
package com.sparta.schedule.service;

import com.sparta.schedule.dto.ScheduleRequestDto;
import com.sparta.schedule.dto.ScheduleResponseDto;
import com.sparta.schedule.entity.Schedule;
import com.sparta.schedule.repository.ScheduleRepository;
import org.springframework.stereotype.Service;

import java.util.List;
import java.util.Optional;

@Service
public class ScheduleService {

    private final ScheduleRepository scheduleRepository;
    public ScheduleService(ScheduleRepository scheduleRepository) {
        this.scheduleRepository = scheduleRepository;
    }

    public ScheduleResponseDto saveSchedule(ScheduleRequestDto requestDto) {
        Schedule schedule = new Schedule(requestDto);

        Schedule savedSchedule = scheduleRepository.save(schedule);

        ScheduleResponseDto scheduleResponseDto = new ScheduleResponseDto(savedSchedule);

        return scheduleResponseDto;
    }

    public ScheduleResponseDto getSchedule(Long id) {
        Schedule schedule = scheduleRepository.findById(id)
                .orElseThrow(() -> new IllegalArgumentException("해당 ID를 가진 할일이 존재하지 않습니다."));
        return new ScheduleResponseDto(schedule);
    }

    public ScheduleResponseDto updateSchedule(Long id, ScheduleRequestDto requestDto) {
        Schedule schedule = scheduleRepository.findById(id)
                .orElseThrow(() -> new IllegalArgumentException("해당 ID를 가진 할일이 존재하지 않습니다."));
        schedule.update(requestDto);
        Schedule updatedSchedule = scheduleRepository.save(schedule);
        return new ScheduleResponseDto(updatedSchedule);
    }
}
실질적으로 실행을 해주는 부분입니다.
saveSchedule로 생성된 할일을 저장해줍니다.
getSchedule로 id를 통해 할일을 찾고 없을 때 예외를 던져줍니다.
updateSchedule를 통해 id와 requestDto에 있는 username, title, description을 반환하고, 예외처리도 해줍니다.
6. ScheduleApplication
package com.sparta.schedule;

import org.springframework.boot.SpringApplication;
import org.springframework.boot.autoconfigure.SpringBootApplication;

@SpringBootApplication
public class ScheduleApplication {

    public static void main(String[] args) {
        SpringApplication.run(ScheduleApplication.class, args);
    }

}
메인 메서드입니다.
추가적으로 수정이 필요한 곳이 application.properties와 build.gradle입니다.
1. application.properties
# spring.application.name=schedule

spring.datasource.url=jdbc:mysql://localhost:3306/데이터베이스이름
spring.datasource.username=사용자이름
spring.datasource.password=비밀번호
spring.datasource.driver-class-name=com.mysql.cj.jdbc.Driver

spring.jpa.hibernate.ddl-auto=update

spring.jpa.properties.hibernate.show_sql=true
spring.jpa.properties.hibernate.format_sql=true
spring.jpa.properties.hibernate.use_sql_comments=true
프로젝트에 맞는 데이터베이스 이름, 사용자 이름, 비밀번호로 수정해주시면 됩니다.
2. build.gradle
plugins {
    id 'java'
    id 'org.springframework.boot' version '3.3.2'
    id 'io.spring.dependency-management' version '1.1.6'
}

group = 'com.sparta'
version = '0.0.1-SNAPSHOT'

java {
    toolchain {
        languageVersion = JavaLanguageVersion.of(17)
    }
}

configurations {
    compileOnly {
        extendsFrom annotationProcessor
    }
}

repositories {
    mavenCentral()
}

dependencies {
    // JPA
    implementation 'org.springframework.boot:spring-boot-starter-data-jpa'
    // MySQL
    runtimeOnly 'com.mysql:mysql-connector-j'

    implementation 'org.springframework.boot:spring-boot-starter-thymeleaf'
    implementation 'org.springframework.boot:spring-boot-starter-web'
    compileOnly 'org.projectlombok:lombok'
    annotationProcessor 'org.projectlombok:lombok'
    testImplementation 'org.springframework.boot:spring-boot-starter-test'
    testRuntimeOnly 'org.junit.platform:junit-platform-launcher'
}

tasks.named('test') {
    useJUnitPlatform()
}
dependencies 부분의 JPA, MySQL 부분을 붙여넣으시면 됩니다.
이제 postman으로 실행하는 법을 알려드리겠습니다.
1. main 실행
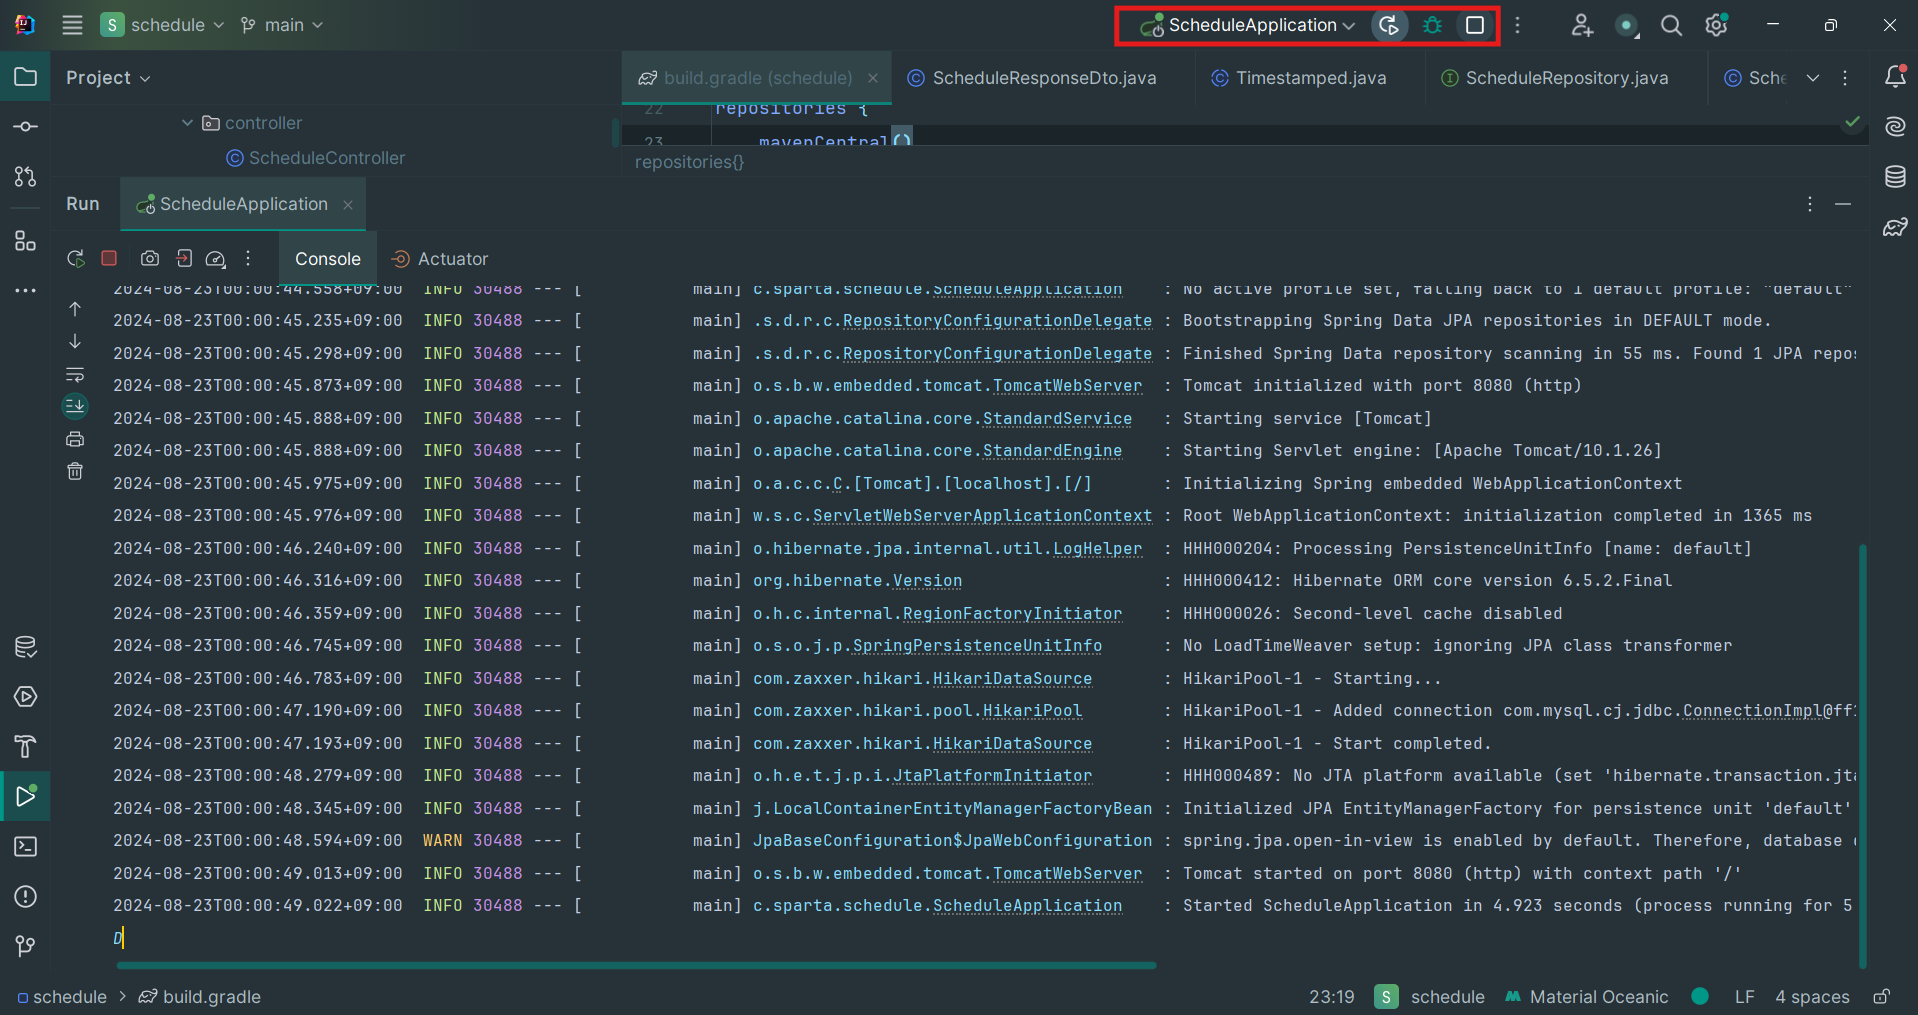
표시된 부분처럼 파일명을 ScheduleApplicaton으로 맞추고 제일 왼쪽의 세모 버튼을 클릭해서 실행시켜주세요.
그러면 밑이 run창이 뜹니다. 만약 에러가 나서 종료가 된다면 문제가 있는 것이기 때문에 에러를 해결해주세요.
2. ScheduleController의 createSchedule 실행

먼저 POST로 설정하신 다음,
http://localhost:8080/api/schedule을 입력하고
밑에 바디에서 raw를 선택하고 JSON을 선택해주세요.
그리고 JSON의 양식대로 username, title, description을 입력해주시고 그에 맞는 내용을 입력해주세요.
마지막으로 send하면 id부터 제대로 출력되는 것을 볼 수 있습니다.
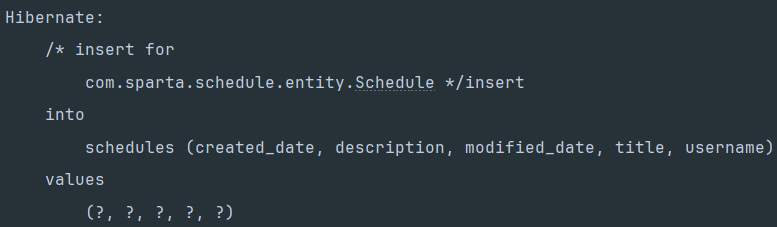
콘솔창에도 잘 입력된 것을 볼 수 있습니다.
3. ScheduleController의 getSchedule 실행

GET으로 설정하고 마지막에 원하는 아이디를 넣고 send하면
아래처럼 제대로 나오는 것을 볼 수 있습니다.

콘솔창에도 제대로 실행되는 것을 볼 수 있습니다.
4. ScheduleController의 updateSchedule 실행

PUT으로 바꾸고 원하는 아이디를 넣고 원하는 부분을 수정해주세요.
username, title, description 어디든 상관 없습니다. 저는 내용 부분에 시각을 수정하고 send했는데
수정된 내용과 modifiedDate까지 제대로 출력되는 것을 볼 수 있습니다.

여기서도 제대로 출력되네요.

MySQL에서도 제대로 반영된 모습을 볼 수 있습니다.
프로젝트 개발을 하다보니 모르는 개념도 알게 되면서 큰 공부가 되었습니다.
질문은 언제나 환영입니다 !!
'개발일지' 카테고리의 다른 글
| [개발일지] KPT 회고 | 잘하고10조의 뉴스피드 프로젝트 제작 회고 (6) | 2024.09.09 |
|---|---|
| [개발일지] 깃 리드미 꾸미기 | 깃 리드미 작성법 | 깃 리드미 이모티콘 삽입 | 깃 리드미 마크다운 문법 (2) | 2024.09.06 |
| [개발일지] 자바 첫 프로젝트를 마무리하며 (1) | 2024.08.12 |
| [개발일지] KPT 회고 작성 | 개발 돌아보기 (1) | 2024.08.08 |
| [개발일지] 엣지 케이스 작성 | 테스트 케이스 작성 | 예외 처리 (0) | 2024.08.08 |